Pages

Birthday Chocolate Chocolate Chip Muffins!

I have a Special Birthday Girl Post!  Happy Birthday to my baby girl!  Her special request for breakfast was Chocolate Chocolate Chip Muffins. 


She is a daughter after her mother's very heart; a Chef de Cuisine just like me, and loves chocolate.  When she created this a few months back I knew she was much farther ahead of the cooking game than me at her elementary age.


It's a notebook turned recipe book and all the pages are filled with cut out recipes from hundreds of magazines she searched for the perfect ones.  She has now started a second, just too cute!


So now you can see why I am so proud.  She loves to help me and even takes things into her own hands by finding and searching for her own recipes to try.  We had to search and find a Chocolate Chocolate Chip Muffin recipe this morning because we have surprisingly never made them before.  But after the results today, we will be making these often.  I have listed some exact ingredients I use, they can be swapped out for similar in your pantry.  I will be adding later on what my favorite products are and why under Ingredients at Their Best for anyone who wants to know my reasoning behind it.  I always use organic even when not noted, but will always chose my ingredients for quality and flavor.


Chocolate Chocolate Chip Muffins
1 C white flour, unbromated and unbleached
1 C whole wheat pastry flour
1/2 C unsweetened cocoa powder
1 1/2 C raw cane sugar (We love Heavenly Organics sugar)
2 tsp aluminum free baking powder
1/2 tsp aluminum free baking soda
1/4 tsp celtic sea salt
1 1/4 C whole milk
1 large egg
2 TB unsalted butter, melted
1 tsp pure vanilla extract
1 C semisweet chocolate chips (We like the mini morsels)

1. Preheat oven to 350 degrees F. Grease muffin cups or line with paper muffin liners.
2. In large bowl, mix flour, cocoa, sugar, baking powder, baking soda and salt and make a well in the center.
3. In small bowl whisk together milk, egg, butter and vanilla. Pour wet ingredients into well in large bowl and whisk just until all combined and wet, do not over mix. There will still be some lumps.


4.  Add chocolate chips and stir just until mixed through.
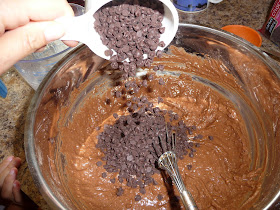

See those cute "helper" fingers?

5. Fill muffin cups 3/4 full.
6. Regular muffin pan, bake for 20-25 minutes. Mini muffin pan, bake 10-15 minutes. They are done when toothpick comes out clean, remember there are melted chocolate chips in there and can sometimes be hard to tell, my mini muffins took 12 minutes.

Results?  Yummy moist muffins for miles.  When I asked the morning crew if these where good, they looked at me and said "Mom these are blog good!" So enjoy and let me know what you think.


Well I am off for a special birthday girl dinner.  Next up?  A birthday girl trip to American Girl store at Mall of America and a birthday Key Lime Cake with Key Lime Glaze.  Have a wonderful evening everyone.

Today's recipes where brought to you by, inspired or adapted from:  AllRecipes.


Going 45 in a 70 While Eating 'Samiches

Going 45 mph in a 70 mile per hour zone...in the left lane! We have all been behind one of those driver's (especially when we are late for some reason, why is that?). Traffic backed up to the last passed exit. Horns blowing and they don't feel any desire to move to the right. They have all the time in the world and think we do too. I would love to be able to take it that slow some days. Who has that kind of time now a days?
This very slow driver got me thinking.....thinking how they look at life. To learn how to be slow in the fast lane. Sometimes we all need to slow down and go 45 in a 70 and enjoy the little things that make our life special.
Enjoy surprises like the ones that come popping out of the perennials you bought from a neighborhood perennial sale. I brought home Daisies which are doing very well but got this as a bonus! What is it? I love it!


Sipping my very favorite coffee....from this cup we got at a 7-eleven when we where in Chicago.  I love 7-eleven and we don't have any here. So sipping from this just makes me smile.  Why do I love it?  I was born on 7-11 so I have just always loved it, well that and their Slurpee bar!


Life moves so quick, look... summer is already over! School is starting, ragweed is blooming, fall is peaking in with overnight temperatures and fantasy football drafts are happening in garages all over the country.

All this reminded me of slowing down and all during the busiest time of the year for me.  Most of us are going 95mph in a 70 mile per hour zone with kids, sports, work, school, gym, housework, dogs!  So a little help is always well received.  Of coarse we can count on the slow cooker, a savory sandwich will be ready when you get home from driving your kids around to sports and activities or putting in extra hours at your job to finish up a project or bless your heart both!  I hope this helps anyone with back-to-school-chaos-brain like I have right now.

When you can't slow down, the slow cooker will slow down for you.


Tangy BBQ 'Samich
Print recipe here
1 3-4 pound Boneless Beef Roast of choice- I used Top Round with medium marbling
1 C onion- sliced
1 C Ketchup
1 C favorite BBQ Sauce- love Sweet Baby Rays
1 C water
2 T vinegar- I think Red Wine vinegar would be good but have not tried yet
2 T Worcestershire Sauce
2 T brown sugar
2 cloves garlic- minced
1 tsp Chili Powder
1 tsp salt
1/ 2 tsp black pepper

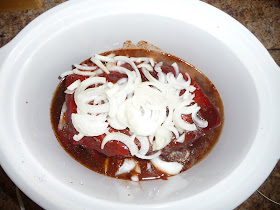
1.  Instructions are easy, dump all in slow cooker. 


2.  Cook on High for 6-7 hours.  Shred meat and let sit a bit for juice to saturate meat.  Pile into a good bun such as Bolilo or Telara and top with cheese. 


3.  If you don't eat it on the way to the oven, you can broil the cheese and buttered bun until golden and crispy.  Note:  I have used pork and chicken with great results.

Life can zoom by like a Mazda on a highway... But!  Please do not take this thought literally...move to the right side or just stay off the interstate if you are lucky enough to view life this way! 

Today's recipes where brought to you by, inspired or adapted from: my Aunt Kris, who make the best Apple Pie! 


Beans and Beans

Hello again and welcome back to Saved by the Egg Timer!
Well that wasn't so bad now was it? It was just like ripping off a Band-Aid. At first you are nervous and afraid of the pain that is to come. Finally you close your eyes and rip- just to open them up and realize you are not sure what you where afraid of! Either that or you rip it off and realize it wasn’t ready to be exposed yet…but thankfully that was not the case.

My first post went great. I have had a fantastic week filled with a lot of head spinning learning going on and loving every bit of it.  Not to mention just a fantastic week in general!  This is why- I have been scoping, craigslist-ing, garage saling and clearance shopping for this all summer...with no luck...until yesterday!
$4 dollars, yes $4.  My ice cream maker has found it's home.  3 freezer bowls, they don't even sell these with 3 bowls!  I almost ran to the checkout...and yes, I will be accepting my MDJ= Major Deal Junky Award later today.  So, if you have any recipes please send!


I have had such great feedback, encouragement, tips and critique. I want to thank all of you who have been so kind and supportive. Now onto the good stuff.

Well, by special request from my very first follower (yeah!)- I need to keep it coming with the herbs.  Just her luck, I have one today and more to come...this sweet and sassy, savory and spicy dish was a huge hit this week.  One of the kids claimed the leftovers right away.  It was one of those days....where I didn't have enough time to think let alone plan a meal.  I quick looked and had all the ingrediants "on-hand" so whipped this up and was so-very-glad I did. 

Sweet and Sassy Beans
Print recipe here
1/2 C brown sugar
1/2 C your favorite barbecue sauce
1/2 your favorite salsa (Kitchen Technique #2)
1/4 C molasses
1 T fresh oregano*
1 1/2 tsp dry mustard
1 1/2 tsp chili powder
1 31- ounce canned pork and beans in tomato sauce
1 16- ounce can Great Northern beans, drained and rinsed
1 16- ounce can red kidney beans, drained and rinsed
1 large onion, chopped
8 pieces bacon, cut into 1 inch pieces
*Fresh/dried herb conversion here

1. In large bowl combine sugar, sauce, salsa, molasses, oregano, mustard and chili.
2. Add undrained pork and beans, drained beans, onion and meat. Stir to combine.


3. Place all in 3 quart casserole dish.
But like I said- it was a busy day and I was speed skimming the recipe.  I just started pouring and mixing and flinging utensils about the kitchen. I put it all together, mixed, poured it in my nice casserole dish.  Timed it out perfectly with a minute to spare.  Got it in the oven and decided to read the article I found this so-easy dish in. Easy? Ha!  Apparently not for me.  Good thing I did, nothing major but I forgot an ingredient. Out it came from the oven and in went the salsa!  Alrighty, back in the oven, again.  (Kitchen Technique #2- Always read the whole recipe before you start making it.)


4.  Bake uncovered at 325 degrees for 2 1/2 – 3 hours.
Note: Beans will thicken as they cool.
Slow Cooker Method: Prepare as above numbers 1-2 then place into a slow cooker. Cover and cook on low for 5-6 hours, high for 2 1/2 to 3 hours.


Results are one casserole of spattery, messy, bubbly, gooey delicious beans!  I also love the fact that I get to use my molasses in any month besides December for Molasses Crinkle Christmas cookies and was nice to put it to good use. As well liked as this dish was- I won't have to dig out the sticky bottle in December just to through it away and buy a fresh one.  So that is always a plus.

We also threw these on the grill and realized they are a summer favorite of mine and should share.  Simple, fresh green beans with a slight grilled flavor. Nothing fancy but very good.


Grilled Green Beans
1 pound of fresh green beans
1 T water per foil packet
olive oil or butter to taste
salt and pepper

1.  Rinse green beans and snap off tops. 
2.  Tear a few large piece of aluminum foil, place beans in middle and pour water over top.  Sprinkle with salt and pepper and drizzle with oil or butter.


3.  Fold up foil into packets and grill about 10 minutes.  Caution: When you open up the packets steam will pour out.


Thank you for coming back to visit my 2nd post at Saved by the Egg Timer.


Today's recipes where brought to you by, inspired or adapted from: MidwestLiving and Me!


Hey we got a first timer out here...and it is all Greek to me!

Hello All and welcome to Saved by the Egg Timer! 

First recipe....ok here we go... I have been reading and following recipe blogs for months.  I like the newness and excitement when I find a really great new blog to read and look through.  Personality is key above all ingredients, when I read them I want to first be uplifted and enjoy the material I read. If your uplifted you are joyful, energized, creative and above all else.......HUNGRY!  By that you will be inspired to create!

It's all Greek to me!  I wasn't sure what to add for my first post, nor do I know at all what I am doing yet. So hang in there with me and any help and suggestions would be welcome and appreciated.

Ok- so I wanted to come out with a bang. A recipe that impressed, delighted and showed off my skill-et....sooooo I decided to go with the seasonal, sensual and summertime seasonings! 

Greek food is great for summertime....a little of these are growing,


and a lot of these.


So utilize the delish, fresh and medicinal packed herbs growing on your deck, farmer's market or grocer's produce section.

Since I have these growing on my deck and have put the effort into watering them daily I better use them, right?  This is actually the first summer and time I have ever grown herbs and have been having pretty good luck and no herb funerals yet...so even those black thumbs may want to try because they can get kind of expensive at the store.  (Kitchen Technique #1-  As a rule of green or black thumbs go- for dried vs. fresh herb conversion is, 1 tsp dried equals 1 T fresh, or 3 times more for fresh). 


Greek Chicken
2 pound boneless skinless chicken breasts
3 T olive oil
4 cloves garlic- minced
1 T fresh rosemary
1 T thyme
1 T oregano
1 lemon- juiced
2 tsp sugar (I used one packet of stevia)

1. Combine all ingredients and marinate chicken for a few hours up to overnight.


2. Grill until juices run clear.  (Cooking Confession #1- My name is Natasha and I am addicted to over-flipping on the grill.)


3.  Serve with my Greek Roasted Potatoes.


NEXT:  Start by going to the farmer's market and pick up some of these


 so you can make this recipe.


Greek Roasted Potatoes
3 pounds red potatoes- quartered
¼ cup olive oil
2 T lemon juice- freshly squeezed
4 cloves garlic- minced
1 T fresh thyme
1 T fresh rosemary
1 T fresh marjoram
¼ teaspoon dried oregano
¼ teaspoon salt
¼ teaspoon ground black pepper

1. Through all this in a metal baking sheet and toss to coat.


2. (a) Now this evening I decided to throw the pan on the grill and cook for 40 minutes watching the temp to stay at around 400 degrees while throwing my Greek Chicken on during the last 20 minutes and it turned out to be a great idea!


    (b) Normally preheat the oven to 400 degrees and bake for 40 minutes or until tender and browned and you will turn out with these golden medallions every time.


So now it is like at the end of a first date and there is that awkward silence.  Your not sure what to say or do.  Should you shake hands?  Lean in for a hug and a super-chic-European-cheek-kiss?  Or run away screaming to your car and floor it outta there in time to watch reruns?


Well, I hope that my very first post and recipes turned out well.  Thanks for stopping by Saved by the EggTimer and come back to check it out again soon!


Today's recipes where brought to you by, inspired or adapted from:  AllRecipes and MelsKitchenCafe, thank you.